Very EATalian

food, photography, italy

  • Home
  • About me
  • Recipes
    • Appetizers
    • Breakfast
    • Cheese & eggs
    • Desserts & Sweets
    • Drinks
    • Fish & Seafood
    • Holidays
    • Meat
    • Pasta & Gnocchi
    • Pizza & Bread
    • Rice & Grains
    • Side Dishes
    • Soups
    • Vegetarian
  • Italy
    • Behind the scenes
    • Life in Italy
    • Travel
  • Contact
  • SEARCH

Swedish Ginger Cookies

December 16, 2015 By very EATalian Leave a Comment

Swedish Ginger Cookies (Pepparkakor) 
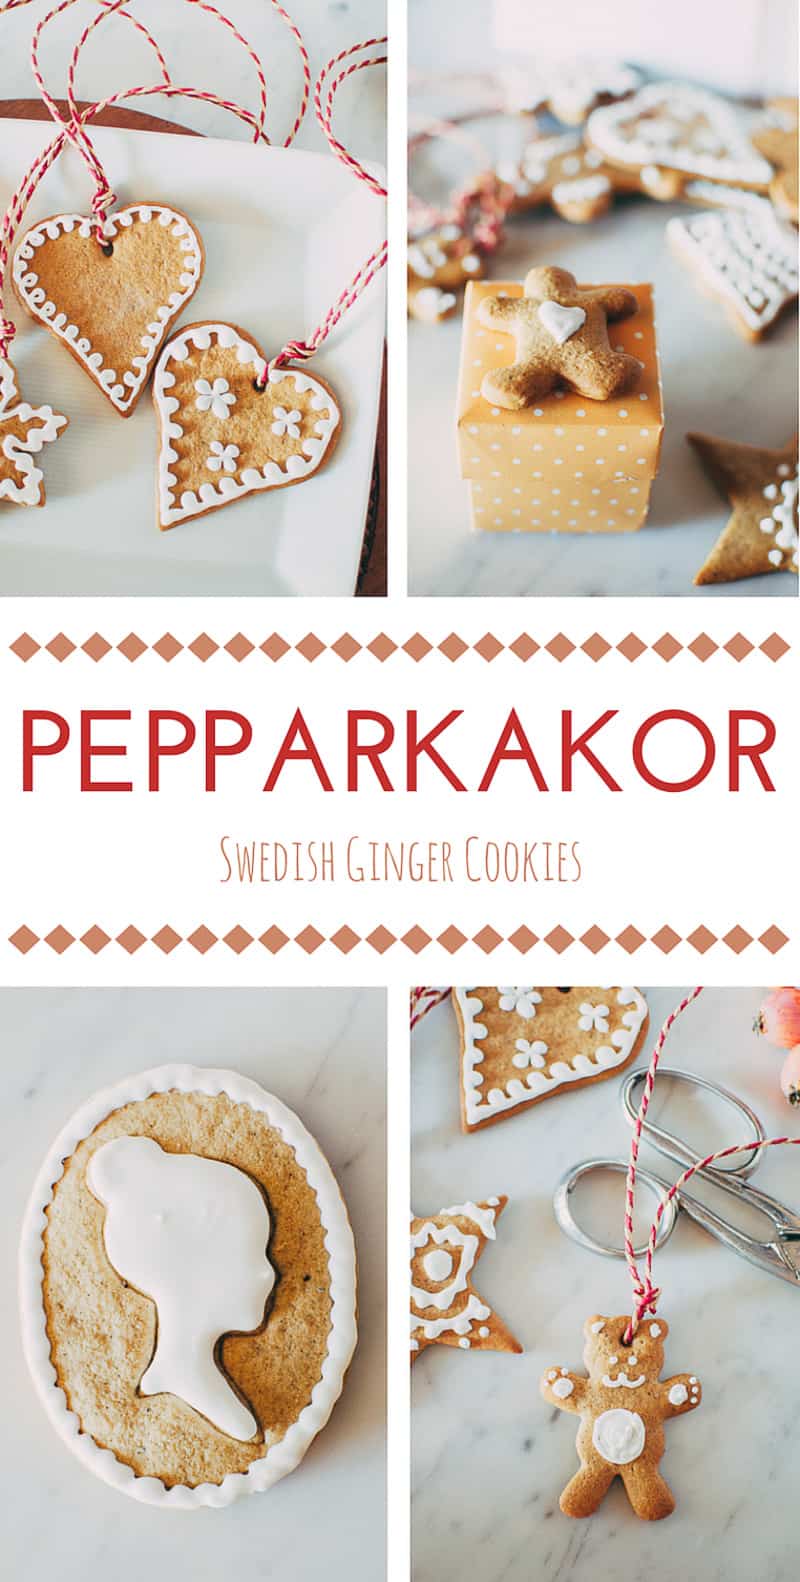
Yeah, yeah, yeah. Pepparkakor aren’t “very EATalian“, I know…BUT they’re cookies I always love to bake around Christmas, so they’ve rightfully earned their place on this blog. Not only do they bring out the Christmas spirit in the house with their wonderful scent, they also spark my creativity. As you can see from the pictures, I went a little crazy with shapes and icing decoration!

Besides being cute Christmas tree ornaments, I found they also make the perfect nice little addition to a rustic gift wrapping.
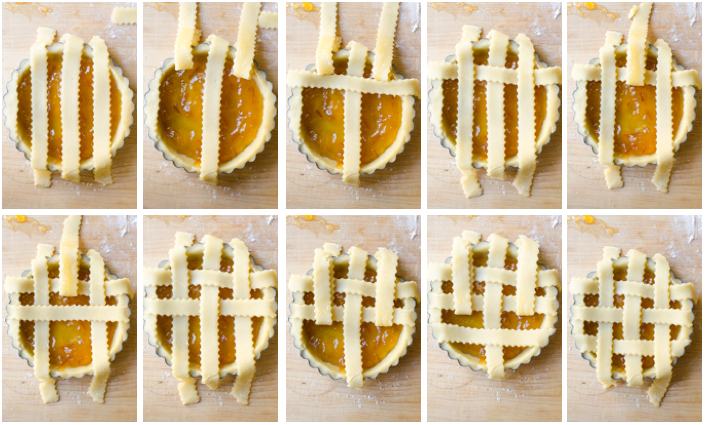
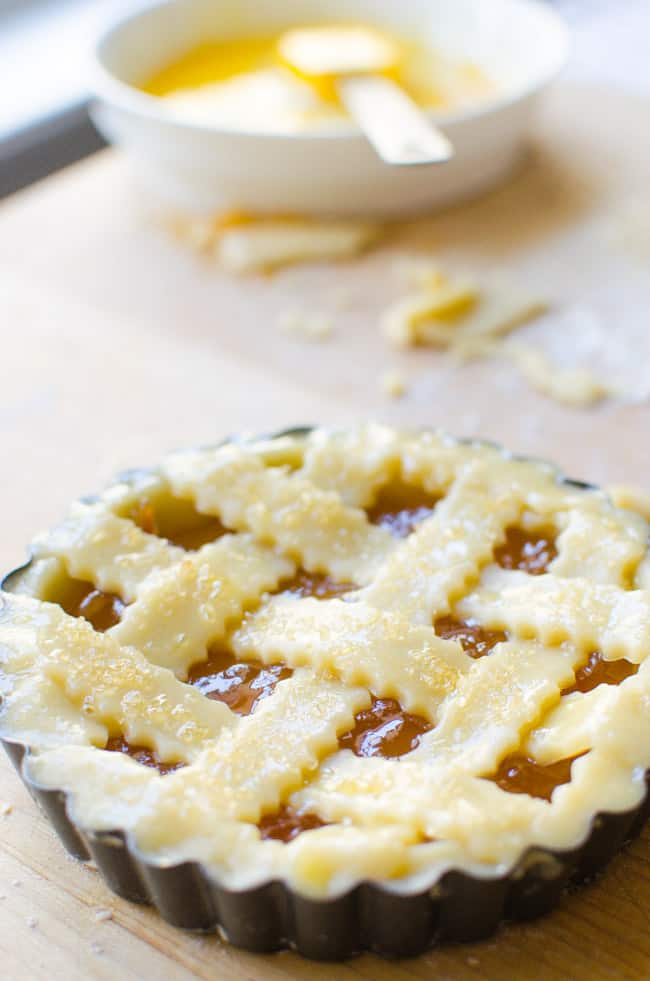
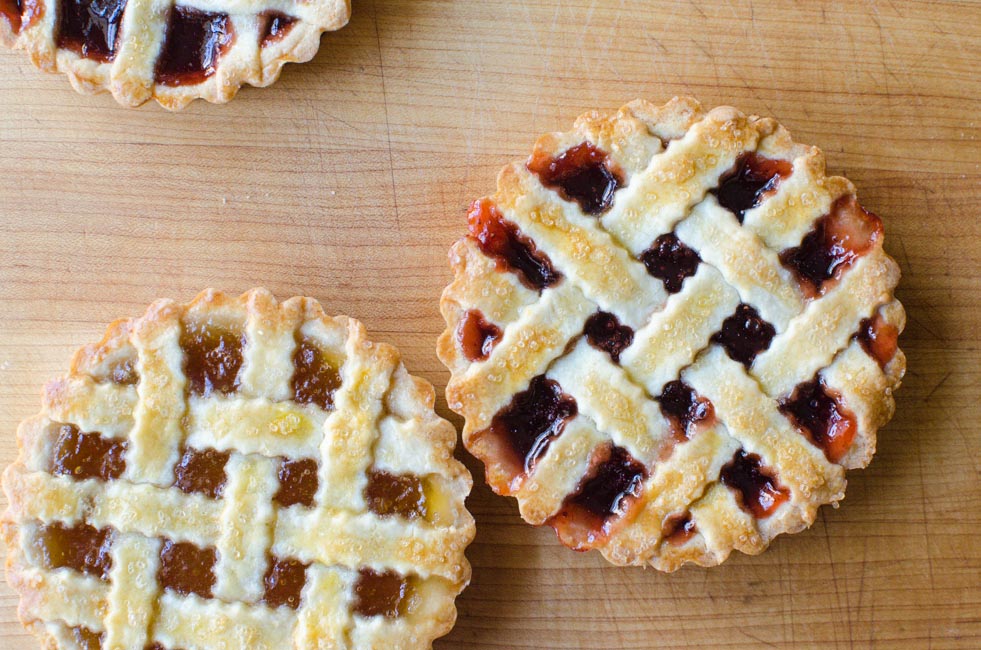
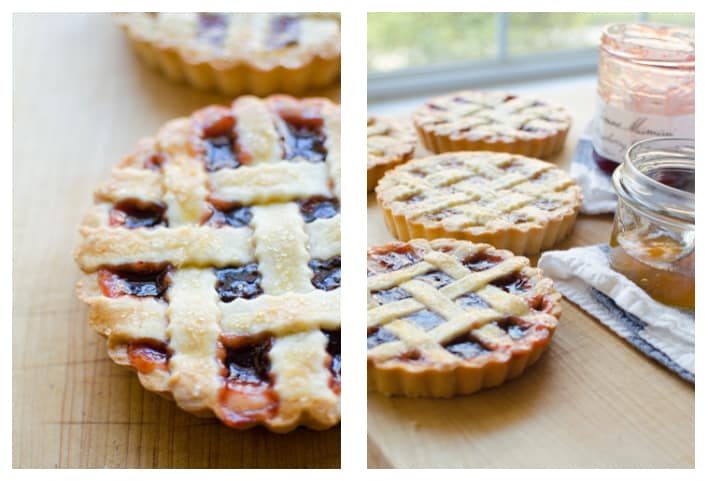
Swedish Ginger Cookies (Pepparkakor)| VeryEATalian

…

Read More »

Filed Under: Desserts & Sweets Tagged With: christmas, cookies, dessert, diy

Old-fashioned Apple Strudel

October 30, 2015 By very EATalian Leave a Comment

Old-fashioned Apple Strudel | Very EATalianApples from my father's orchard | Very EATalian
I know apples are good for you, you should eat-an-apple-a-day-to-keep-the-doctor-away, yadda yadda yadda…but I gotta confess I’m not a big apple eater. My poor little jaws easily get tired at munching the quintessential healthy fruit. Crunch, cruuunch, cruuuuunch. Can I have a softer, juicier pear instead? [If you read me for the first time, I’d like to specify I’m not 80 years old and I have all my teeth in place.]

Anyways, I’m sure you figured I wouldn’t present you with a recipe I wouldn’t eat myself. That’s right – because I DO enjoy eating apples when they’re cooked and I love them in pretty much anything – filled pasta, meats (remember my Cjalsons and Pancetta-wrapped Pork Tenderloin with Apples?)… and, of course, desserts! …

Read More »

Filed Under: Desserts & Sweets, Friuli Tagged With: apples, dessert, fall recipes, friuli recipes

Torta Caprese: Gluten-free Chocolate Almond Cake

July 1, 2015 By very EATalian Leave a Comment

Torta Caprese - Gluten-free Chocolate Almond Cake | veryEATalianA couple of days ago I tried to make my husband’s birthday special with a little family celebration via Skype. I had everybody wear party hats and I drew a colorful poster as a background for our performance of a loud-and-out-of-tune Happy Birthday. Since I was at it, I also made a nice cake for the occasion. He loved the singing and the poster part. I’m pretty sure he hated me for showing him a cake he couldn’t eat.

Who makes a birthday cake for somebody when they can only see it and not taste it?

How painful, I know…But I’m a firm believer there’s no birthday without a cake…so I HAD to make it.

The cake I made was Torta Caprese and it’s hands down one of my favorite chocolate cakes. As the name suggests, this cake comes from the gorgeous Island of Capri, near Naples. Unlike most cakes, Torta Caprese has no flour but lots of ground almonds which give it a nice texture throughout. Also, there’s no baking powder in it – it’s leavened only by whipped egg whites.  I read somewhere this recipe was created by mistake: the lack of flour was a complete accident made by a sleepy pastry chef. What a fortunate oversight! It’s at once light, rich, and moist…plus, chocolate and almonds are just made for each other.

This cake is definitely a no-frills cake and it’s so simple and delicious it perfectly stands on its own. All this cake begs for is a nice dusting of powdered sugar on top of its crispy and thin crust – a nice finishing touch to make it beautiful and elegant. If you really want to do something extra, have an espresso with it!

Here are the photos of the cake I made to torture celebrate my hubby!

[TANTI AUGURI, amoreeee!]

Torta Caprese - Gluten-free Chocolate Almond Cake | veryEATalian

Torta Caprese - Gluten-free Chocolate Almond Cake
 
Print
Prep time
30 mins
Cook time
50 mins
Total time
1 hour 20 mins
 
Serves: 8-10
Ingredients
  • 200 g (13 Tbsp + 1 tsp) butter, diced and softened
  • 180 g (6.3 oz OR 1 scant cup) sugar (divided)
  • a pinch of salt
  • 4 eggs
  • 150 g (5.3 oz) dark chocolate
  • 200 g (7 oz) almonds, toasted
  • powdered sugar
Instructions
  1. Divide yolks from egg whites.
  2. Cream softened butter with 140 g (2/3 cup) of sugar. Add salt and yolks, one at a time. Mix well to blend all the ingredients. Refrigerate the mixture.
  3. Using a food processor, ground toasted almonds.
  4. Preheat oven to 360 F (180 C).
  5. Melt chocolate on a double boiler. Once melted, let it reach room temperature.
  6. In a separate bowl, whip egg whites with the rest of the sugar to stiff peaks.
  7. Add melted chocolate and ground almonds to butter mixture. Mix well. With a spatula, gently fold egg whites into mixture.
  8. Pour batter into a greased 7-inch (18 cm) spring form pan and bake for 50 minutes. Remove from oven and let it cool off. Dust with powdered sugar and serve.
Notes
The cake should be moist inside.

Adapted from Sale&Pepe: http://www.salepepe.it/ricette/dolci-dessert/torte-crostate/torte/torta-caprese/
3.3.3077

Filed Under: Desserts & Sweets Tagged With: almonds, cake, Chocolate, dessert, flourless, gluten free, torta

Rustic Peach Crostata and a Picnic in my Dad’s Orchard

June 22, 2015 By very EATalian Leave a Comment

Rustic Peach Crostata |veryEATalianI’m a HUGE fan of picnics—perhaps, I’m the most enthusiastic “picnic-ER” you’ll ever meet and I have tons of good memories from past family outings. When I was little, I used to love singing in the car with my parents. Then, as I grew older, the excitement was mainly for the games we’d play all together, or the places we explored and hiked. These days, it’s simply about enjoying each other’s company in the middle of nature. Food definitely plays a good part in making the whole event more pleasant.

Ever since I got back to Italy, I’ve been wanting to go on a picnic with the whole family SO badly. Unfortunately, not everybody’s schedule seems to line up (at least for this month)…so I tried to compensate. A few days ago, despite the chilly weather, I decided to gather whomever was around, grab a table and a few chairs and set out an impromptu picnic in my dad’s orchard, a few steps beyond our fence. It’s definitely not a wild or picturesque mountain scenery, nonetheless a nice and enjoyable place–conveniently located next door! I’m surprised it took us so many years to realize it’s more than just a place for foraging or taking walks.

Picnic in the Orchard | veryEATalianMy mom and I teamed up and prepared all the food in the morning. We made a farro salad with sautéed veggies, a nice and soft focaccia bread, a few crispy eggplant fritters, and a beautiful rustic peach crostata. Not bad for an improvised get-together! We also quickly boiled a few eggs (a must for any picnic) and we packed them up in our cute picnic basket (I love that thing!). I made coffee as well, as I really wanted to use this tacky-but-kinda-adorable coffee thermos I found in the basement. Then, I loaded a couple of folding chairs, a little table and a couple of blankets on a wheel barrel and I carried everything to the orchard. The rest of the group followed me with the food.

We had a fun and relaxing lunch and it was so nice to be together, under the shade of my dad’s trees. It’s a meaningful place for my family as those trees were planted by my dad and grandfather. They were little twigs and now they’re full sized trees! Amazing.

Everybody raved about my crostata. The crust was nicely colored and perfectly textured: it was buttery, delicate, and flaky. I used Saturn peaches as filling and was able balance their very sweet flavor with a good amount of lemon juice and the tartness of a few cherries. Visually speaking, the crostata is colorful and imperfectly beautiful…in a word: rustic!! This recipe is absolutely a keeper and I’ll definitely make it again soon, before peach season is over.

Picnic in the Orchard | veryEATalian
Rustic Peach Crostata |veryEATalian

Rustic Peach Crostata
 
Print
Prep time
1 hour 45 mins
Cook time
55 mins
Total time
2 hours 40 mins
 
Author: Adapted from Bon Appétit, July 2002
Serves: 8-10
Ingredients
  • -CRUST
  • 1⅔ cups (210 g) all-purpose flour
  • ¼ cup (42 g) polenta flour (coarse cornmeal)
  • 3 Tbsp (42 g) sugar
  • ¼ lemon peel, grated (use about ½ lemon)
  • ¾ tsp (4 g) salt
  • 14 Tbsp (200 g) chilled unsalted butter, cut into ½-inch cubes
  • ⅓ cup (75 ml) ice water
  • -FILLING
  • ¼ cup (57 g) sugar
  • 1½ tsp (5 g) cornstarch
  • 4 medium saturn peaches, each pitted and cut into slices
  • a handful of cherries, pitted
  • ½ lemon, juiced
  • ½ tsp vanilla extract
  • 1 egg, beaten
  • Raw sugar crystals
  • Peach preserves, heated
Instructions
  1. Combine the first 5 ingredients in a processor and blend for 5 seconds. Add butter and blend just until butter is reduced to pea-size pieces. Add ice water. Blend until dough comes together in moist clumps (adding more water if dough is dry). Form a ball (adding more flour, if necessary) and flatten into disk. Wrap and chill for at least 1 hour.
  2. Let dough soften slightly at room temperature and roll it on lightly floured sheet of parchment paper, turning it occasionally to prevent sticking. Transfer onto a round baking pan (the edges will probably stick out). Chill until dough firms slightly, about 15 minutes.
  3. Mix fruit, sugar, cornstarch, lemon juice, and vanilla in a bowl. Let stand until juices are released, stirring fruit occasionally, about 10 minutes.
  4. Preheat oven to 375°F. Take dough out of the fridge. Spoon fruit and juices into center of dough leaving out the edges. Lift about 2 inches of dough border and fold it down over fruit. Brush folded border with egg glaze; sprinkle with raw sugar.
  5. Bake until crust is golden brown and fruit filling is bubbling, about 55 minutes. Remove from oven and brush fruit with peach preserves. Serve warm or at room temperature.
Notes
To ensure a flaky crust, be careful not to overwork the butter.
3.3.3077

Filed Under: Desserts & Sweets, Life in Italy Tagged With: crostata, dessert, peach crostata, peaches, tart

Mini Jam Tarts

March 31, 2015 By very EATalian Leave a Comment

Mini Jam Tarts | veryEATalian-10
Mini Jam Tarts | veryEATalian-22These little tarts (crostatine in Italian) were one of my favorite afternoon snacks when I was a kid. Back then, my grandmother used to buy them from the grocery store and kept them in her pantry, right next to the paper napkins. When it was ora della merenda (“snack time”- around 4pm), I’d run next door and sneakingly grab one of them. I even remember further digging in the box to look for a little match box that contained a little surprise toy (Sorpresine del Mulino Bianco may sound familiar to whomever was a child in the 80s in Italy!). I spent so many afternoons playing with my brother and my cousins with a crostatina in one hand and one of those little toys in the other. Who needed videogames back then? Sure, we watched cartoons but we certainly spent a lot of time outside playing with simple things like those little toys…and we were happy kids!

When I recreated this childhood snack, I couldn’t help but smile while reminiscing about those times. These tarts are only made of short pastry dough and jam. Quite simple, isn’t it? Their small size and the beautiful lattice top make them look so adorable! I couldn’t stop taking photos of them and – ahem – you can tell I went a little overboard this time…

Mini Jam Tarts | veryEATalian-12
Mini Jam Tarts | veryEATalian-11
Mini Jam Tarts | veryEATalian-14
Mini Jam Tarts | veryEATalian-16
Mini Jam Tarts | veryEATalian-28
How to Make a Lattice Pie Crust | veryEATalian
Mini Jam Tarts | veryEATalian-29
Mini Jam Tarts | veryEATalian-20
Foto coppia 1
Mini Jam Tarts | veryEATalian-3
Mini Jam Tarts | veryEATalian
Mini Jam Tarts | veryEATalian-6
Mini Jam Tarts | veryEATalian-9
Mini Jam Tarts | veryEATalian-26

MINI JAM TARTS – CROSTATINE ALLA MARMELLATA
Servings: Makes five 4.75″ tarts (8-10 people) | Prep time:  15 min (dough) + 25 min (tarts assembling) | Rest time:  30 min  | Bake time: 30 min

Recommended equipment: 4.75″ tart pans, rolling pin

INGREDIENTS
Short Pastry Dough
150 g (10 Tbsp + 2 tsp) unsalted butter
125 g (1/2 cup + 2 Tbsp) granulated sugar
1 large egg
250 g (2 cups) all-purpose flour
a dash of vanilla
a pinch of salt
vegetable oil for plastic wrap
a bit of sugar to sprinkle on top

Filling
13 oz jam (1 jar)

Egg wash
1 egg
1 Tbsp water or milk

INSTRUCTIONS
1. Cream butter with sugar using a stand mixer. Add salt, egg, and vanilla extract.
2. Sift flour and add it into the mixture. Once flour is incorporated, remove dough from mixing bowl and knead briefly until you obtain a smooth dough.
3. Wrap it in lightly oiled plastic wrap and refrigerate for 30 minutes.
4. Once the dough has rested, place it on a lightly floured surface and roll it out to a bit less than 1/8 inch (3mm). Add flour if too sticky. Cut dough in circles to fit into each tart pan, trimming the dough to cover the bottom and sides of the pan. Reserve excess dough for lattice top.
5. Heat oven to 350F.
6. Pour jam into dough-lined tart pans until half full.
7. Roll out remaining dough and cut into strips. Form a lattice top by following photo tutorial above. Trim even with the crust edge and pinch to seal.
8. Make egg wash by mixing 1 egg and 1 tablespoon of milk or water. Brush strips and crust edge with egg wash. Sprinkle a little sugar on top of egg-washed crust.
9. Bake for 30 minutes, or until crust is golden brown.

Buon appetito!

-Lisa

Filed Under: Breakfast, Desserts & Sweets Tagged With: crostata, dessert, jam, short pastry, snack, tart

Castagnole

February 17, 2015 By very EATalian 2 Comments

Castagnole-7
Today is the last day of Carnevale–Martedì Grasso. It’s the last day to indulge in food and sweets before the start of Lent, a season of fasting and abstinence.

The most well-known Carnevale celebration in Italy is the one in Venice:  locals and visitors alike are drawn to the people wandering and posing around the city, dressed in eighteenth century attire and beautiful masks.  I love this spectacle and it’s truly beautiful, but it’s unique to Venice. In other parts of Italy, you’ll see floats and parades where people (especially kids) are dressed up in any kind of costume. It’s basically like Halloween in the US.

I’m a total sucker for dressing up. Any friend of mine will confirm I’m the most excited person they know around this time of the year (and they’re usually perplexed about my uncontrollable enthusiasm). I loved dressing up when I was a kid and I still do as an adult. The most memorable costume I’ve ever made? A cupcake, put together with random materials I found around the house, including a wine demijohn basket. Although there’s a part of me that would love to share a photo of “cupcake Lisa”, I’ll just leave that one private! I’ll share this one, instead:

Processed with VSCOcam with hb2 preset

I was 3 years old. Alas, my love for Carnevale wasn’t particularly showing that day.

Back home, a few weeks before Fat Tuesday, my mom and my aunts get together to make our favorite Carnevale fritters: frittelle, crostoli, and castagnole. As usual, it’s a lot of fun–from the assembly-line action, animated discussion and laughter, and the inevitable critiquing and tough love from helpful spectators.

Of these fritters, I particularly love castagnole. They get their name from their shape, which is similar to a chestnut (castagna, in Italian).  They are small, sweet bites of fried dough, with a hint of rum or grappa–and they are sneakingly addictive. Here is the recipe for you, courtesy of my mom.

Castagnole

Castagnole-2

Castagnole-3

Castagnole-4

Castagnole-5

Castagnole-9

Castagnole-11

Castagnole-12

CASTAGNOLE
Serves: 4 people | Prep time: 20 min | Cook time: 15 minutes

INGREDIENTS
1 egg
30 g (2 Tbsp) sugar (+more for dusting)
zest of 1/2 orange
25 g (2 Tbsp) unsalted butter, melted
6 g (2 tsp) baking powder
a pinch of salt
a dash of grappa or rum
110 g (1 scant cup) all pupose flour
peanut oil

INSTRUCTIONS
1. Combine eggs and sugar in a bowl and mix until creamy. Add melted butter, salt, grappa (or rum), and orange zest. Mix all ingredients with a fork or a whisk. Add some flour & baking powder.  Then gradually add the rest of the flour.
2. Lightly knead the dough on a floured surface until smooth. The dough should be slightly sticky, yet workable. Roll the dough in 3/4 inch-thick logs, cut them in small pieces, and roll each piece in little balls.
3. Heat peanut oil in a saucepan. Fry your castagnole is small batches, turning them with a spoon to ensure even results.  The temperature of the oil shouldn’t be too hot or too low. It’s a good idea to cut one open to check it’s cooked through.
4. Once they have reached a light golden brown color, remove them with a slotted spoon, and place them in a bowl lined with paper towel to absorb the oil in excess. Roll them with sugar when they are still hot.


Filed Under: Desserts & Sweets, Holidays Tagged With: Carnevale, castagnole, dessert, dough, fried, rum

Tiramisù

February 14, 2015 By very EATalian 5 Comments

Tiramisu | veryEATalian-9

Tiramisù doesn’t require any introduction. Everybody knows it and everybody loves it. It’s such an easy dessert; no baking is required, only fresh ingredients.

Every time I make it I think of my friend Gina. She’s one of the most enthusiastic, fun, and energetic people I know. If you are around her, you know you’re going to have a good time. From the moment she tasted my tiramisù at one of our office potlucks, she started raving about it to everybody and she still does, after so many years! If I were to sell it, I’d definitely hire her as my spokesperson.

I’ve never been very secretive about my recipes and when Gina asked me if she could share it with a friend, I was all for it. I should clarify this recipe is slightly revised from the traditional one; I use whipped heavy cream instead of whipped egg whites. The result is a creamier and richer texture. I sometimes like to add chocolate chips to the cream, to add a bit of a crunch.

Tiramisù has always been my family’s favorite birthday dessert. This year, it’s my Valentine’s Day treat for my husband.

Buon San Valentino everyone!

Tiramisu | veryEATalian

Tiramisu | veryEATalian-8

Tiramisu | veryEATalian-3

Tiramisu | veryEATalian-5

Tiramisu | veryEATalian-2

Tiramisu | veryEATalian-7

TIRAMISU’
Serves: 8 people | Prep Time: 40 min | Resting Time: 3-4 hrs

INGREDIENTS
3 fresh large egg yolks*
6 Tbsp sugar (+ 2 Tbsp for the coffee)
500 g (17.6 oz) mascarpone cheese
250 ml (~1 cup) heavy cream
1 1/2 cups espresso coffee, cooled
(optional) A dash of Marsala wine or coffee liqueur
400 gr (14 oz) Savoiardi or ladyfingers cookies
Unsweetened cocoa powder, as needed

INSTRUCTIONS
1. Beat the egg yolks with a whisk in a bowl and gradually add the sugar until thick and pale. Add the mascarpone cheese to the egg yolk and sugar mixture and mix it all together until smooth.
2. Whip the heavy cream in a separate bowl to stiff peaks.
3. Gently fold the whipped cream into the mixture, carefully stirring with a spoon, until you obtain a smooth, rich, and thick cream.  [Tip: If the cream is too thin, cover it and refrigerate it until achieves the right consistency]
4
. Pour the coffee and 2 tablespoons of sugar in a bowl. Add a bit of Marsala wine or liqueur in it, if you like it, and let it cool off.
5. Dip the savoiardi cookies in the coffee for about two seconds. The soaked cookie shouldn’t be too dry or too soggy. Start forming the first layer, placing each cookie side by side until you cover the whole surface of the baking dish or bowl (you can break the cookies, if necessary).
6. Pour a layer of the cream mixture on top, alternating with another layer of savoiardi. The final layer should be cream.
7. Dust generously with cocoa powder. Cover the dish with foil or plastic wrap and refrigerate it for 3 or 4 hours. Eat within two days (good luck making it last more than 1 day!).

Buon appetito!

-Lisa

*This dish contains raw eggs. Use only fresh and clean eggs with intact shells and avoid any contact between the yolk and the shell.

Filed Under: Desserts & Sweets Tagged With: coffee, dessert, espresso, italian, ladyfingers, savoiardi, tiramisu

  • « Previous Page
  • 1
  • 2
  • Bloglovin
  • Facebook
  • Instagram
  • Pinterest
  • Tumblr
  • Twitter

WELCOME!

WELCOME!

I'm Lisa and this is where I like to share Italian recipes and stories about my Italian family. If you'd like to learn more about me, head over to my About page.

[F O L L O W • M E • O N • B L O G L O V I N' ]

Recipes from Friuli Venezia Giulia

Creamy Polenta with Grana Padano Cheese Fondue | Very EATalian

More Posts from this Category

Pasta & Gnocchi

Spaghetti with Tuna, Lemon and Creamy Stracciatella, Cheese | Very EATalian
Simple and flavorful Pasta e Ceci (Pasta with Chickpeas) | Very EATalian
Orecchiette with Sausage, Broccoli Rabe, and Sun-dried Tomatoes | Very EATalian
Butternut squash ravioli with sage and amaretti cookie crumbles

More Posts from this Category

Sweets & Dessert

Ciambelle al Vino: Crunchy Wine Cookies | Very EATalian
Jam-filled Pasta Frolla Cookies! Buttery, sweet and tart, they're versatile and perfect for Valentine's Day!
Crostoli: a perfectly crisp Carnevale Treat | Very EATalian

More Posts from this Category

Thanksgiving in Italy

September: time to harvest grapes to make “Il Vino del Nonno”

Trip to Sicily

Tasting Frittelle in Venice

Behind the Scenes of a Grappa Distillery

Behind the Scenes of an Artisanal Fresh Pasta Shop

STAY CONNECTED!
  • Bloglovin
  • Facebook
  • Instagram
  • Pinterest
  • Tumblr
  • Twitter
All recipes, written content, and photographs on this website have been created exclusively for Very EATalian (unless otherwise noted) and are protected by copyright. You may not use any content from this website for commercial use without express permission from the author.
Creative Commons License
This work is licensed under a Creative Commons Attribution-NonCommercial-ShareAlike 3.0 Unported License.

© 2025 Very EATalian. All rights reserved