Very EATalian

food, photography, italy

  • Home
  • About me
  • Recipes
    • Appetizers
    • Breakfast
    • Cheese & eggs
    • Desserts & Sweets
    • Drinks
    • Fish & Seafood
    • Holidays
    • Meat
    • Pasta & Gnocchi
    • Pizza & Bread
    • Rice & Grains
    • Side Dishes
    • Soups
    • Vegetarian
  • Italy
    • Behind the scenes
    • Life in Italy
    • Travel
  • Contact
  • SEARCH

Orzotto (Barley Risotto) with Dandelion Greens and Mascarpone Cheese

April 13, 2015 By very EATalian Leave a Comment

Orzotto with Dandelion Greens and Mascarpone Cheese | veryEATalian-8
Have you ever foraged for wild greens? I know it may sound a bit hippy, but I have–several times, actually! In Italy during the springtime, I used to tag along with my mom and aunts as they went through the open fields behind the house, looking for wild greens such as poppy and dandelion leaves. If we were lucky, we also found hop shoots and nettles. We usually left in the mid-afternoon and came back at dusk with bags full of green goodies which inevitably ended up in a nice risotto or a tasty frittata.

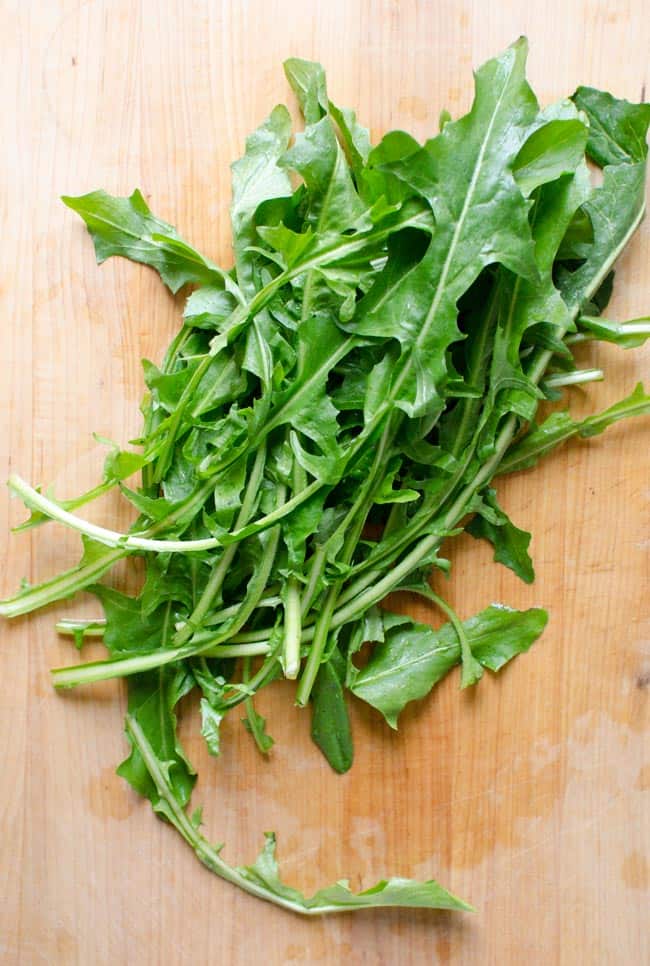
It’s a very frugal and nature-friendly way of eating, but you have to be able to recognize edible plants otherwise you may end up eating greens that simply taste bad or, even worse, are poisonous. The good news is you can enjoy these flavorful wild greens without becoming a foraging expert. Certain grocery stores and farmers markets occasionally carry them. For example, I found these beautiful dandelion leaves at The Fresh Market!

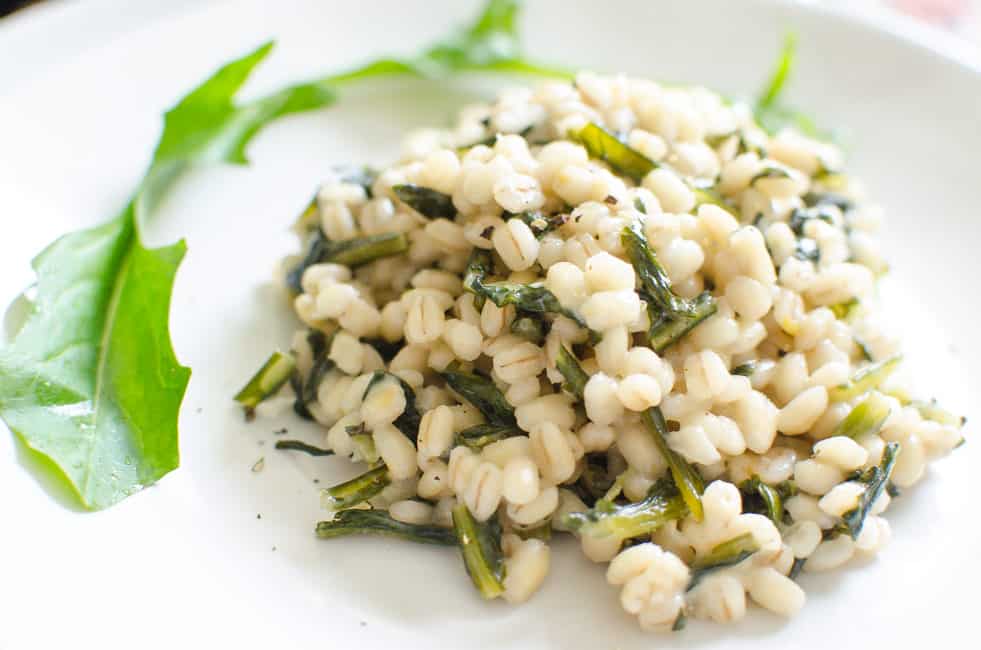
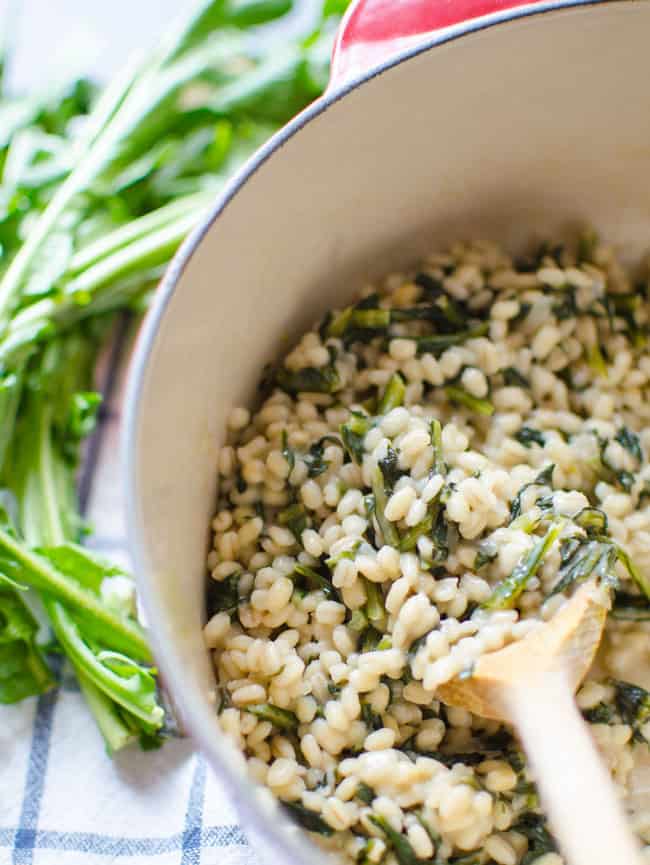
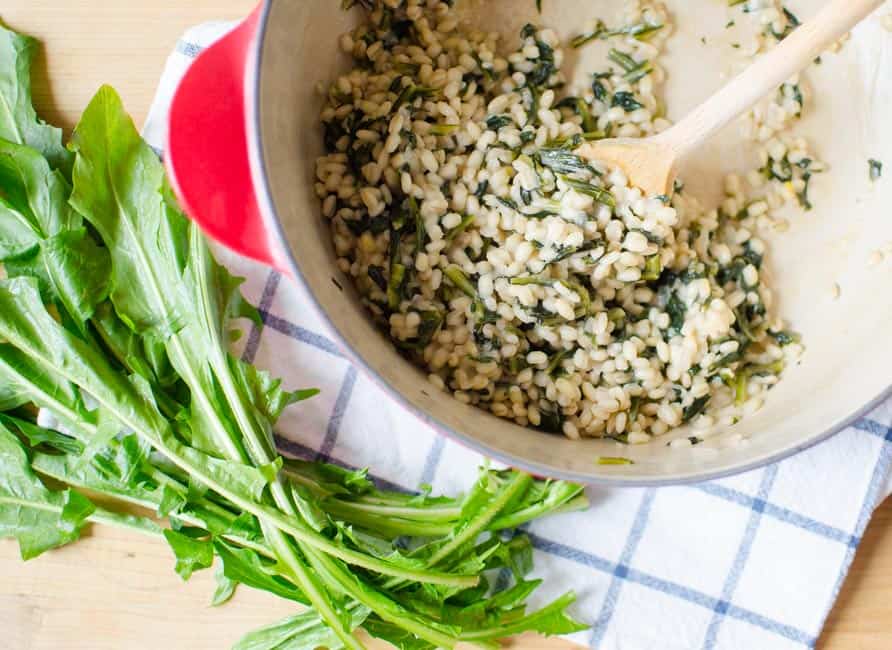
Dandelion greens are super nutritious: they are rich in iron and calcium and loaded with vitamins A, C and K. They can be a tad bitter but, when cooked, their sharp flavor gets milder. In this springtime recipe, I added dandelion greens to an orzotto, which is barley (orzo, in Italian) cooked the exact same way as rice in a more traditional risotto–by toasting the grain with sautéed onion or shallot, and then adding wine, followed by broth. The mascarpone cheese is a last-minute addition I made to further mitigate the bitterness of the dandelion greens. The orzotto turned out perfect: creamy, fresh, and delicate.

Orzotto with Dandelion Greens and Mascarpone Cheese | veryEATalian
Orzotto with Dandelion Greens and Mascarpone Cheese | veryEATalian-2
Orzotto with Dandelion Greens and Mascarpone Cheese | veryEATalian-3
ORZOTTO WITH DANDELION GREENS AND MASCARPONE CHEESE
Orzotto al tarassaco e mascarpone

Servings: 2 | Prep time: 10 min | Cook time: 30 min

INGREDIENTS
1 lt (32 oz) vegetable broth
a small bunch of dandelion greens, roughly chopped
a drizzle of extra-virgin olive oil
1 Tbsp unsalted butter
¼ cup shallot, chopped
3/4 cup quick-cooking barley (I used Trader Joe’s 10-min barley)
(optional) ¼ cup dry white wine
¼ cup mascarpone cheese
a handful of Parmigiano Reggiano cheese, grated
salt
freshly ground black pepper

INSTRUCTIONS
1. Bring vegetable broth to a boil in a saucepan. Add dandelion greens in it and cook for 3-4 minutes. Remove them from the saucepan with a strainer and set aside. Keep broth simmering throughout the recipe.
2. In a separate heavy-bottom saucepan, heat butter and extra-virgin olive oil over medium heat. Add chopped shallot, and sauté until translucent.
3. [Take note of the time, as I’ll use this exact moment as reference (*)] Turn the heat to medium-high, add the barley and toast it for a couple of minutes, stirring frequently. Pour in the wine (or ¼ cup of broth) and cook until absorbed.
4. Turn the heat to medium-low. Add a ladle of broth and let the barley absorb the liquid, stirring occasionally. Once the liquid is absorbed, add a ladle of broth again. [Repeat this step throughout the recipe, letting the barley absorb each addition of broth.]
5. 6-7 minutes in (*), add dandelion. Stir. Keep on adding broth as it gets absorbed by the barley.
6. 16-17 minutes in (*), stop adding broth. Let the barley absorb the last bit of liquid.
7. 20-25 minutes in (*), the barley should be creamy and al dente. Remove from heat and stir in mascarpone until melted. Add parmesan cheese and, only if necessary, a bit of salt. Stir vigorously for about a minute to make orzotto ever creamier. Let rest for 2-3 minutes.
8. Sprinkle with  freshly ground black pepper. Serve hot.

Buon appetito!

Lisa

Filed Under: Friuli, Rice & Grains, Vegetarian Tagged With: barley, dandelion, mascarpone, orzotto, tarassaco, vegetarian, wild greens

Pizza Margherita with Cherry Tomatoes

March 18, 2015 By very EATalian Leave a Comment

I’m a firm believer there’s only one pizza deserving of the name: a light, thin-crust pizza topped with just enough quality ingredients. No fancy deep dish pie, with cheese-filled crust or multi-layered toppings can compare to the wonderful, simple, and tasty delight of a traditional Italian pizza.

Pizza Margherita with Cherry Tomatoes | veryEATalian-2Now that you know how particular I am about this Italian “sacred food”, you’ll also be able to understand how frustrating it was for me to find a legitimate pizza once I left Italy. When my husband and I arrived here, we initially tried a couple of  restaurants claiming to serve the real Italian-style pizza. After tasting entirely burnt crusts and too-plastic-to-be-real-mozzarella, I decided it was just time to improve my own home-made pizza recipe.

Believe it or not, even for the average Italian home cook it’s quite hard to achieve a crust similar to the one you’d taste at a pizzeria–one with a great wood oven to give the crust incredible flavor and texture. Unfortunately, I’m a regular person with a regular kitchen…and no plans for installing a commercial pizza oven. However, after a bit of research and a couple of adjustments, I think I’ve managed to achieve a pretty legit home-style pizza.

There are a few tricks you need to know and I included them in the recipe below. I didn’t bother adding a bunch of toppings; for good pizza you just need a couple of high-quality ingredients. The key is keeping it simple!

Pizza Margherita with Cherry Tomatoes | veryEATalian-5
Pizza Margherita with Cherry Tomatoes | veryEATalian-6
Pizza Margherita with Cherry Tomatoes | veryEATalian-7
Pizza Margherita with Cherry Tomatoes | veryEATalian
Pizza Margherita with Cherry Tomatoes | veryEATalian-11
Pizza Margherita with Cherry Tomatoes | veryEATalian-8
Pizza Margherita with Cherry Tomatoes | veryEATalian-9
Pizza Margherita with Cherry Tomatoes | veryEATalian-3
Pizza Margherita with Cherry Tomatoes | veryEATalian-10
Pizza Margherita with Cherry Tomatoes | veryEATalian-13
Pizza Margherita with Cherry Tomatoes | veryEATalian-4
PIZZA MARGHERITA WITH CHERRY TOMATOES
Servings: 2 | Prep time: 20 min | Rest time: 2 hours | Bake time: 16 min

NOTE: In this recipe I used two different types of flour. You can use just one, as long as you keep the  same ratio of flour/water (250 g/150 ml). Once again, I recommend using a digital scale to achieve best results!

Recommended equipment: 15″ pizza stone

INGREDIENTS
200 g (7 oz) finely milled Italian flour (Tipo “00”) or all-purpose flour
50 g (1.8 oz) whole wheat flour
150 ml (5 oz) lukewarm water
3.5 gr (1/2 packet) active dry yeast
1 tsp sugar
1/2 tsp salt + 1/2 tsp salt for the sauce
200 ml (6.7 oz) unsalted strained tomatoes — the best quality you can find
a sprinkle of dry oregano
200 g (7 oz) mozzarella cheese (ovoline or bocconcini), drained and shredded — the best quality you can find
10 cherry tomatoes, halved
10-12 basil leaves

INSTRUCTIONS
1. Dissolve yeast and sugar in a glass of lukewarm water. Sift the flour in a medium-sized bowl and add the yeast/water/sugar mixture in it. Work the dough with your hands and knead until all ingredients are well incorporated. Add salt.
2. Take the dough onto a clean work surface and start kneading until it reaches a soft, elastic, and smooth texture.  Take the dough and bang it on the work surface, about 6-7 times. Form the dough into a ball and place it in a bowl, covered with a clean dishtowel. Let it rest for 2 hours in a dry place.
3. While the dough is resting, prepare the tomato sauce by combining the strained tomatoes with 1/2 tsp of salt, 1 tsp of sugar and a sprinkle of oregano.
4. After the dough has rested, turn oven to 450°F. Dust the pizza stone generously with flour. Take the dough, form a small disk with your hands and start pulling out the sides, stretching it until it covers the whole pizza stone [don’t overwork it!]
5. Spread the tomato sauce on the pizza dough with a spoon, leaving an edge for the crust. Bake for about 8 minutes.
6. Remove pizza from the oven, sprinkle the shredded mozzarella on top and bake pizza for 6 more minutes.
7. Remove from the oven and add cherry tomato halves, cut side-up. Bake for 2 more minutes, until the mozzarella is lightly brown-colored and the crust is golden.
8. Remove pizza from the oven. Add fresh basil leaves on top and let it sit for about 5 minutes before serving.

Buon appetito!

-Lisa

Filed Under: Pizza & Bread, Vegetarian Tagged With: basil, cherry tomatoes, mozzarella, pizza

Sautéed Artichokes

February 25, 2015 By very EATalian 4 Comments

Sauteed Artichokes | veryEATalian-4

I realize artichokes can look somewhat intimidating. Just like Pablo Neruda describes in his Ode to the Artichoke, they look like little warriors, covered up in scales and armed up for battle. The truth is, in spite of their “scary” appearance, they only require few preparation steps and they are very nutritious. For those who don’t know how to  clean an artichoke, don’t despair. Here’s a quick visual tutorial I drew for you! I hope it helps 🙂

Sauteed Artichokes Tutorial | veryEATalian

Sauteed Artichokes Tutorial | veryEATalian-2

Sautéed artichokes are a simple and delicious side dish my mother often prepares. Nobody in my big Italian family passes the dish around the table without taking a generous spoonful from it. I’ve had artichokes prepared in several different ways, but this is my absolute favorite one. They are crunchy and soft; savory, sweet, and a bit tangy. I like to eat them warm or cold…I place any leftovers in a little bowl and I cover them with extra-virgin olive oil so I use them as a pizza topping the next day. The jarred version doesn’t stand a chance!

Sauteed Artichokes | veryEATalian-5
Sauteed Artichokes | veryEATalian
Sauteed Artichokes | veryEATalian-2
Sauteed Artichokes | veryEATalian-7
Sauteed Artichokes | veryEATalian-3
Sauteed Artichokes | veryEATalian-8

SAUTEED ARTICHOKES
Servings: 2 | Prep Time: 15 min | Cook Time: 5-6 min

INGREDIENTS
2 big artichokes
1 lemon (+ 1 to squeeze on top)
extra-virgin olive oil
a splash of dry white wine
coarse salt
(optional) a small bunch of parsley, chopped

INSTRUCTIONS
1. Squeeze a lemon in a bowl full of water and drop it in it.
2. Clean the artichokes, by snapping the dark green outer leaves until only the tender and pale inner leaves remain. Cut off the top part of the artichoke. Trim the stem end, remove the outer skin around it and remove any dark parts around the bottom. Cut it in half and scoop out the hairy inner part. Cut in smaller sections and drop them in the bowl of water & lemon to prevent them from turning dark.
3. Heat a bit of extra-virgin olive oil in a non-stick skillet. Add garlic.
4. When the garlic sizzles, add artichokes and turn the heat to medium-high. Sauté for 5-6 minutes, until tender, but still crisp. Stir with a spoon to avoid burning. Add chopped parsley, if desired, shortly before removing from the heat. Serve with a squeeze of lemon on top.

Buon Appetito!

-Lisa

Filed Under: Side Dishes, Vegetarian Tagged With: artichokes, garlic, lemon, saute, side dish

Blood Orange and Fennel Salad

February 22, 2015 By very EATalian 2 Comments

When faced with the task of planning a menu for a special occasion or a dinner with friends, I easily get caught up in fancy ideas. I want to surprise my guests by out-doing myself and preparing many sophisticated dishes. I see it as a way to show them my love…Do I maybe also like to show off my cooking skills? You bet. Unfortunately, sometimes the fancy multi-course meal can become quite laborious and stressful. By the time I hear the doorbell ringing, I’m so exhausted I feel like I just ran a marathon. Those are the moments when I’m especially grateful for the invention of under-eye concealer.

So here’s my own reminder that delicious stress-free, fancy-looking recipes for special occasions DO exist. This Sicilian salad, for example, is super easy, flavorful, bright, fresh, and seasonal. You can prepare the ingredients ahead of time, and just assemble and season the dish right before serving.

I love the idea of preparing something simple, yet refined. Less work and less time spent on a side dish equals less stress and more time spent taking care of other important hosting details, like table setting or, in my case, not looking disheveled when I open the door!

Sometimes, less is more.

Blood Orange and Fennel Salad | veryEATalian-5

Blood Orange and Fennel Salad | veryEATalian-8

Blood Orange and Fennel Salad | veryEATalian-10

Blood Orange and Fennel Salad | veryEATalian-2

BLOOD ORANGE AND FENNEL SALAD
Servings: 2-3 | Prep time: 15 minutes

INGREDIENTS
3 medium-sized blood oranges
1/2 fennel bulb, very thinly sliced crosswise
a few thin slices red onion, cut crosswise
1 Tbsp extra-virgin olive oil
1 tsp balsamic vinegar
1 tsp orange juice
coarse sea salt
freshly ground black pepper
mint leave or fennel fronds for garnish

INSTRUCTIONS
1. Using a sharp knife, remove all skin and pith from all blood oranges. You can divide it in segments or, more easily, slice it crossways. Place orange slices or segments in a bowl.
2. Add thinly sliced fennel and onion.
3. In a small bowl, combine extra-virgin olive oil, balsamic vinegar, and orange juice. Whisk together and drizzle all over the salad. Season to taste with salt and freshly ground black pepper. Garnish with mint leaves or fennel fronds.

Buon appetito!
-Lisa

Filed Under: Side Dishes, Vegetarian Tagged With: blood orange, citrus, fennel, onion, orange, salad, side dish, winter

Risotto with Taleggio Cheese, Pears, and Walnuts

February 20, 2015 By very EATalian 2 Comments

Brrrrr. Today it’s wintertime here in Florida; it’s unusually cold and windy outside. I love the cold weather, especially because it allows me to flaunt my fashionable hats, gloves, and scarves. When it’s windy, though, I’d rather lock myself up in the house. In fact, as I’m writing this, I’m all wrapped up in my favorite blanket, sipping on a cup of hot tea and still mentally savoring the warm, delicious risotto I prepared today.

I’ve been tickled by the idea of preparing a nice risotto with taleggio cheese and pears for a long time, but I’ve never been able to find this cheese in grocery stores around here. Finally, a very cool and beautiful store that recently opened up in St. Petersburg, called Locale Market, has put an end to my extensive search. Hallelujah.

Risotto with Taleggio Cheese, Pears, and Walnuts | veryEATalian-10

In case you didn’t know, taleggio is an intense, rich, semi-soft cheese. It’s known for its pungent and strong aroma, and its unexpectedly mild, sweet and lightly tangy flavor. It melts really well, and it’s perfect for winter dishes. An Italian saying goes “al contadino non far sapere quant’è buono il cacio con le pere”, which means “don’t tell a farmer how good cheese is with pears”, implying that he would charge more or never part with them in the first place. There’s so much truth in this old saying! Pears and cheese are divine together.

When I unwrapped the taleggio cheese from its packaging, the strong aroma pervaded the whole kitchen. Despite the pungent smell of this cheese, you wouldn’t believe how delicate, yet flavorful this risotto turned out. The sweetness and brightness of the pear perfectly balanced the buttery and rich flavor of the taleggio. A final sprinkle of walnuts added further texture to the dish.

It was exactly what I needed in this cold and windy day–a flavorful and comforting risotto to warm me up.

Risotto with Taleggio Cheese, Pears, and Walnuts | veryEATalian-8

Risotto with Taleggio Cheese, Pears, and Walnuts | veryEATalian-9

Risotto with Taleggio Cheese, Pears, and Walnuts | veryEATalian

RISOTTO WITH TALEGGIO CHEESE, PEARS, AND WALNUTS
Servings: 2 | Preparation time: 10-15 minutes | Cooking time: 25 minutes
Note: If you can’t find taleggio, you can substitute it in this recipe with a soft gorgonzola or fontina cheese

INGREDIENTS
1 lt (32 oz) vegetable broth
extra-virgin olive oil
1 Tbsp butter (+ ½ Tbsp)
1/4 cup shallot, chopped
1 big Bosc pear, diced
175 g (1 cup) arborio or carnaroli rice
50 g (~2 oz) taleggio cheese, diced
(optional) ¼ cup dry white wine
a handful of parmesan cheese, grated
a handful of walnuts, coarsely chopped
salt
freshly ground black pepper

INSTRUCTIONS
1. Heat vegetable broth in a saucepan.
2. In a dutch-oven (or a thick-bottom pot), add 1 tablespoon of butter and a drizzle of extra-virgin olive oil over medium-low heat. Add chopped shallot, and sauté until translucent.
3. [The risotto cooks in about 20 minutes] Turn the heat to medium-high, add the rice and toast it briefly, stirring frequently with a wooden spoon. Once the rice grains start to look shiny and semi-transparent, pour in the wine or ¼ cup of broth. Let the rice absorb the liquid.
4. Turn the heat to medium-low and add a ladleful of broth. Stir until the liquid is absorbed. Repeat this step throughout the recipe, adding broth and stirring the rice often, letting it absorb the liquid slowly.
5. Halfway through (about 10 minutes after adding rice), add the diced pears. Continue adding broth regularly, until the rice is plump and al dente. I usually stop adding liquid about 17 minutes in.
6. When the rice is al dente, remove it from the heat. Add taleggio cheese, ½ tablespoon of butter and the parmesan cheese. Add salt, if necessary. Stir vigorously for about a minute to make it creamy. Let rest for 2-3 minutes.
7. Sprinkle with chopped walnuts and freshly ground black pepper. Serve hot.

Buon Appetito!

Lisa

Filed Under: Rice & Grains, Vegetarian Tagged With: bosc, cheese, pears, risotto, taleggio, walnuts, winter

  • « Previous Page
  • 1
  • 2
  • 3
  • Bloglovin
  • Facebook
  • Instagram
  • Pinterest
  • Tumblr
  • Twitter

WELCOME!

WELCOME!

I'm Lisa and this is where I like to share Italian recipes and stories about my Italian family. If you'd like to learn more about me, head over to my About page.

[F O L L O W • M E • O N • B L O G L O V I N' ]

Recipes from Friuli Venezia Giulia

Creamy Polenta with Grana Padano Cheese Fondue | Very EATalian

More Posts from this Category

Pasta & Gnocchi

Spaghetti with Tuna, Lemon and Creamy Stracciatella, Cheese | Very EATalian
Simple and flavorful Pasta e Ceci (Pasta with Chickpeas) | Very EATalian
Orecchiette with Sausage, Broccoli Rabe, and Sun-dried Tomatoes | Very EATalian
Butternut squash ravioli with sage and amaretti cookie crumbles

More Posts from this Category

Sweets & Dessert

Ciambelle al Vino: Crunchy Wine Cookies | Very EATalian
Jam-filled Pasta Frolla Cookies! Buttery, sweet and tart, they're versatile and perfect for Valentine's Day!
Crostoli: a perfectly crisp Carnevale Treat | Very EATalian

More Posts from this Category

Thanksgiving in Italy

September: time to harvest grapes to make “Il Vino del Nonno”

Trip to Sicily

Tasting Frittelle in Venice

Behind the Scenes of a Grappa Distillery

Behind the Scenes of an Artisanal Fresh Pasta Shop

STAY CONNECTED!
  • Bloglovin
  • Facebook
  • Instagram
  • Pinterest
  • Tumblr
  • Twitter
All recipes, written content, and photographs on this website have been created exclusively for Very EATalian (unless otherwise noted) and are protected by copyright. You may not use any content from this website for commercial use without express permission from the author.
Creative Commons License
This work is licensed under a Creative Commons Attribution-NonCommercial-ShareAlike 3.0 Unported License.

© 2025 Very EATalian. All rights reserved